
We feature a range of vet surgical courses depending on the areas a vet surgeon wants to specialize in.
Dr Charles Kuntz, Specialist Surgeon for Vetdojo explains the procedure for extracapsular repair of a cranial cruciate ligament rupture.
He uses a modified technique to pass the suture around the fabella.
There are numerous options available for repair or treatment of cranial cruciate ligament disease in dogs. While procedures like Tibial Plateau Levelling Osteotomy (TPLO) are widely performed and have been shown to have superior outcomes when compared to extracapsular suture repairs there is still a place for performing an extracapsular repair in dogs. There are numerous reasons why a TPLO may not be performed, these include the cost of the procedure, the geographic inability to get to a surgeon that can perform this procedure and the ability of the veterinary surgeon to perform this procedure.
When performed correctly and with appropriate patient selection, an extracapsular repair can be used as a viable option for treating cranial cruciate ligament disease. A good to excellent outcome is typically seen in around 80% of dogs. Large dogs and very active dogs and dogs with a high tibial plateau angle are cases where an alternative to the extracapsular repair should be considered.
Some of the important factors that can improve the chance of a successful outcome following an extracapsular repair include: a complete assessment of the joint with evaluation and treatment of the meniscus/meniscal injuries, placement of the suture material at isometric locations, use of a suture material that strong enough and resistant to stretching.
The following technique describes one method for performing an extracapsular repair in small dog (<10kg). This technique requires minimal specialised equipment and is something that is commonly performed in general practice. In larger dogs or very active dogs, consideration should be given to using braided suture materials that are stronger and more resistant to stretching, using bone tunnels or bone anchors as the attachment points for the suture to the bone, or considering if an alternative procedure (ie TPLO) may be more appropriate.
How to perform extracapsular repair on a dog
A standard lateral parapatellar incision is made. The incision is first made through the skin. The subcutaneous tissues are separated and then the biceps fascia is incised in a standard lateral patellar location. Care should be taken to make the incision through the biceps fascia 3-4mm lateral to the patella. If this incision is too far caudal then there can be a risk of injuring the long digital extensor tendon.
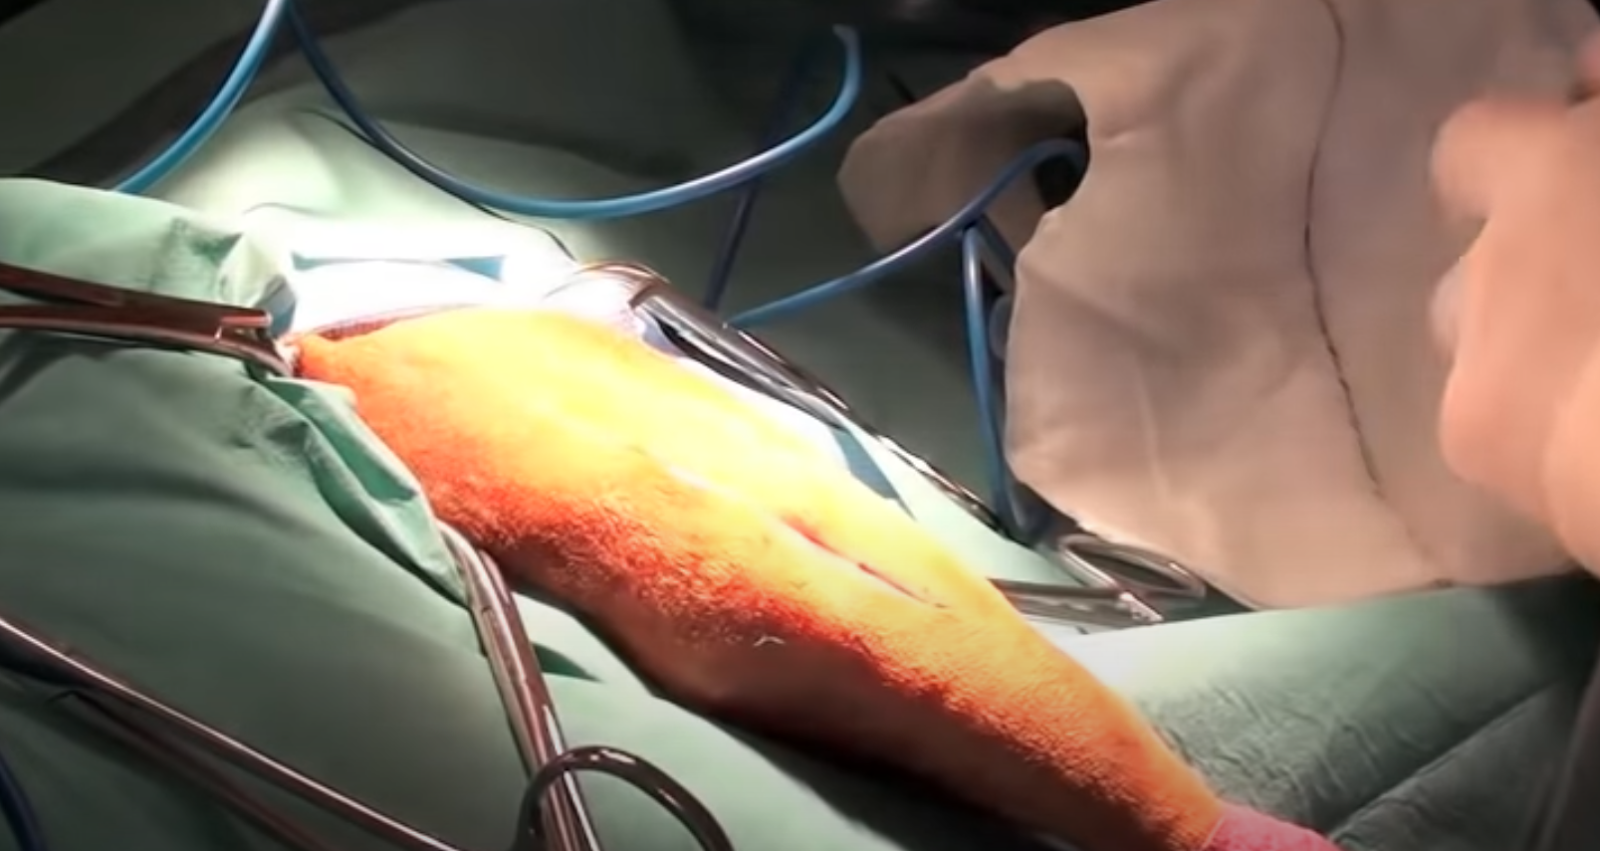
Following incision through the biceps fascia, the joint capsule can be incised. Gelpi retractors are very useful for displacing the patella immediately and increasing exposure to the joint.

A Senn retractor is then used to pull the infrapatellar fat pad distillate and increase exposure of the joint.

A Hohmann retractor is then used to displace the tibia cranially so that the medial meniscus is more visible. It’s important that the medial meniscus is always evaluated for injury. A meniscal probe can be used to palpate the meniscus and to look for damage/tears. Use of a meniscal probe will markedly improve the accuracy of meniscal assessment.

The joint should be flushed thoroughly with saline prior to closure.

The joint capsule is closed with 3/0 PDS in a simple continuous pattern. The joint capsule should be closed now to keep the intraarticular structures moist and to reduce the risk of further bacterial contamination.

Once the joint capsule is completely closed, Gelpi retractors are used to increase the exposure to the lateral fabella by separating the fascia lata from the joint capsule on the lateral aspect of the joint.

A good way to pass the fabella suture is to use a 14 gauge needle and pass it between the femur and the fabella. The needle is passed in a slightly cranial direction from a point just distal distal to the fabella.

The next step is to grasp the needle using a right angle forcep on the opposite side of the fabella to the needle. The forceps are passed just dorsal to the fabella and directed towards the needle that has been passed between the femur and the fabella. This technique allows you to pass the suture without entrapping any soft tissue.

Once the needle is grasped on the medial aspect of the fabella, the suture material is then passed through the needle. The needle is very carefully removed from the jaws of the right angle forcep. All that’s left is the suture material.
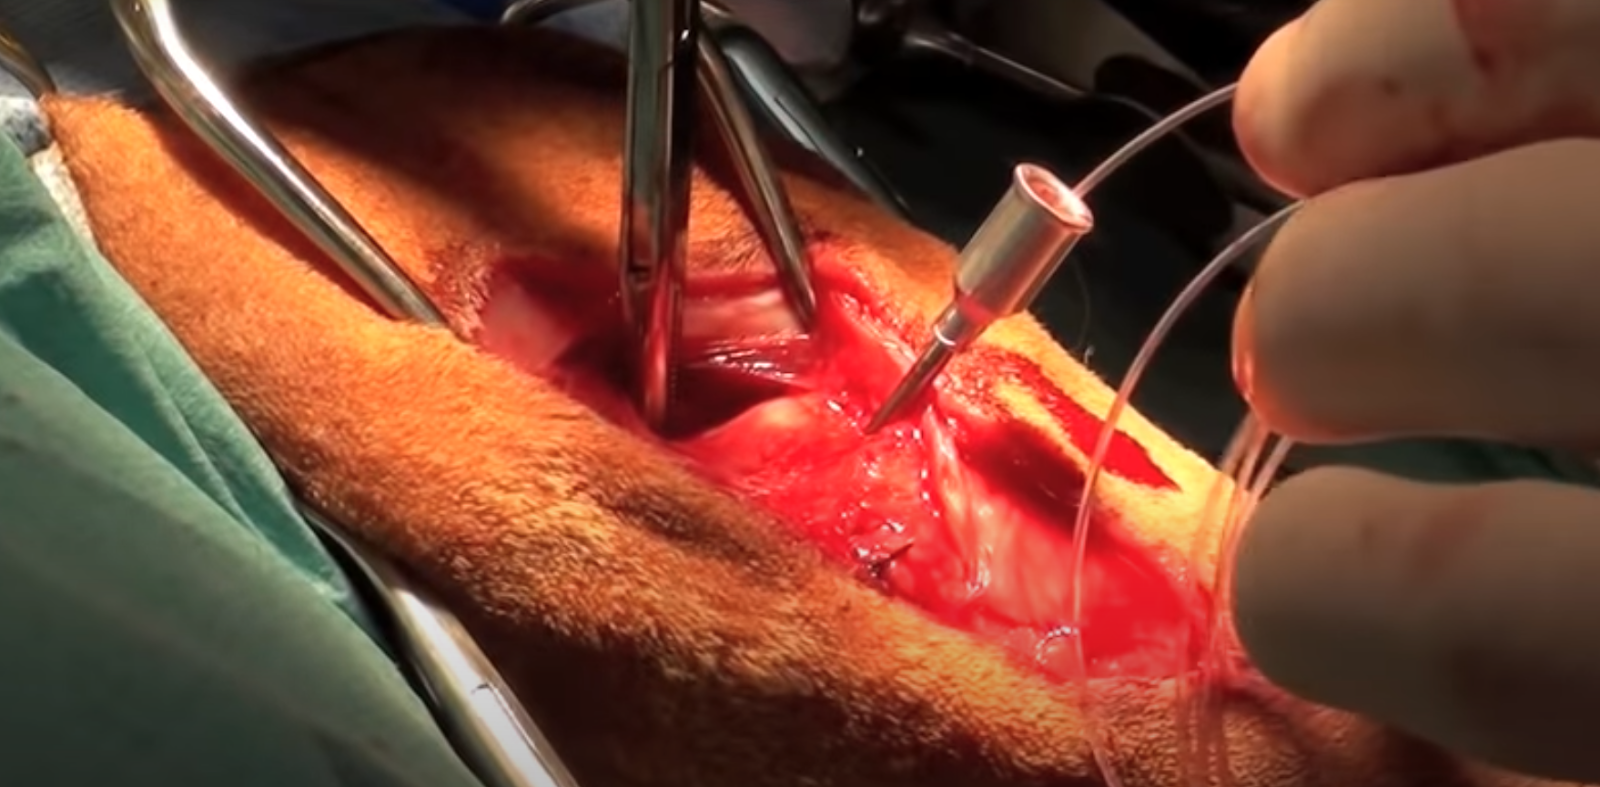
For a small dog (Less than 10kg), a 40 pound test nylon is fine. Pull the right angle forceps out while grasping the suture material at the right angle.
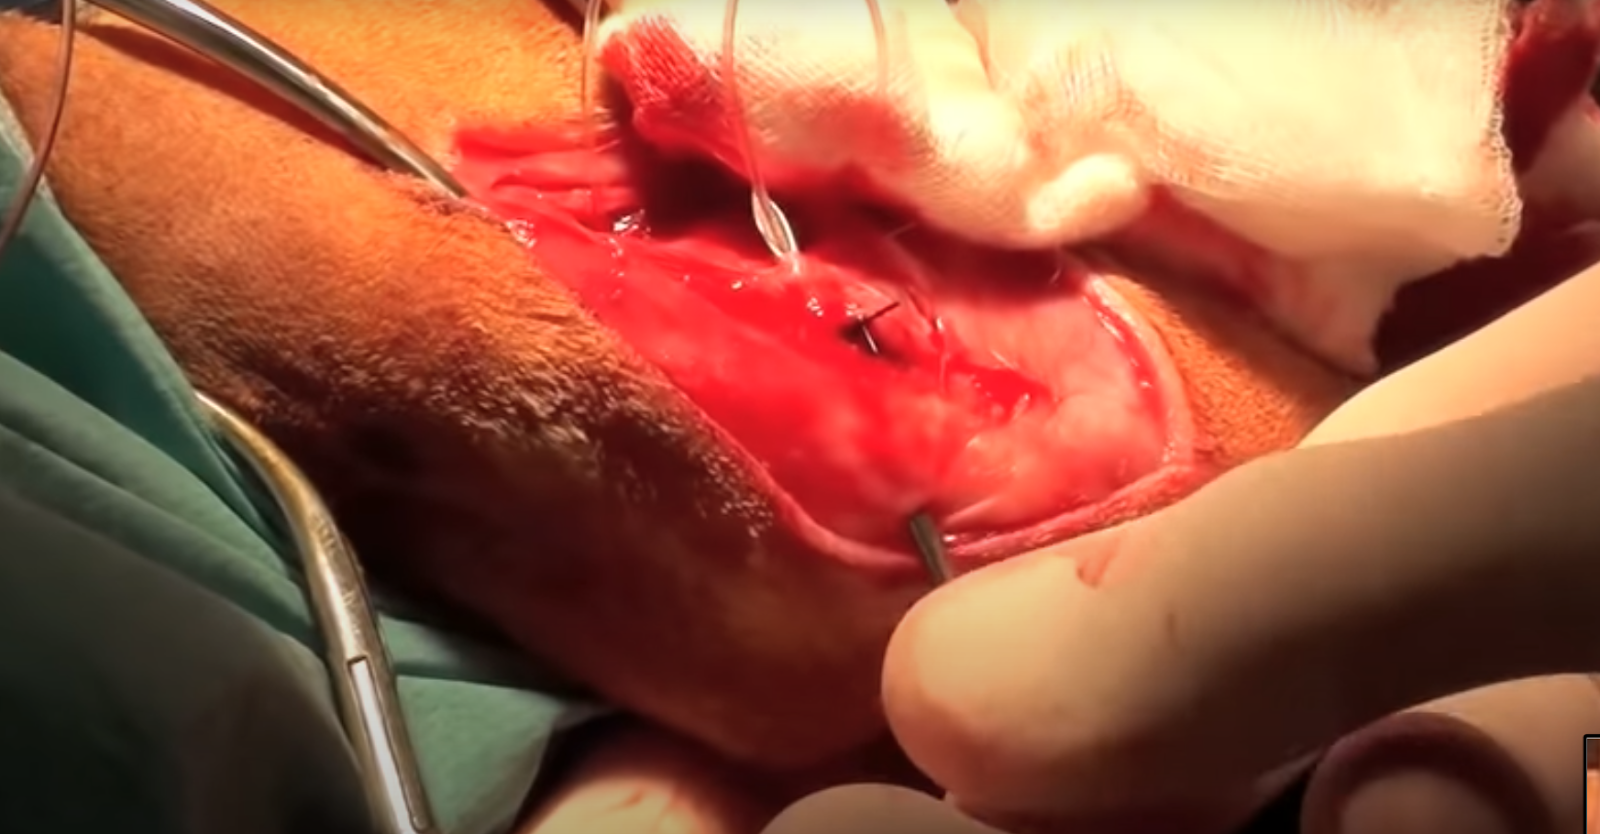
Use the 14 gauge needle to pass underneath the patellar tendon from a medial to lateral direction. Pass the suture that is proximal to the fabella through that needle. The same 14 gauge needle can be used to create a bone tunnel through the tibia. The location of this bone tunnel is very important. The goal is to have the bone tunnel as close to the native insertion of the cranial cruciate ligament as possible. The ideal location for this suture is very close to the extensor groove at the proximal aspect of the tibia.
Placement as close to this point as possible is important as this represents a more isometric location compared to more distal or cranial locations of the bone tunnel. Using attachment points that are as isometric as possible are essential when performing an extracapsular suture repair. Using an isometric anchor point minimises the tendency for there to be an increase or decrease in the tension on the suture through a range of motion of the stifle. Placement in a non-isometric location is a common reason for the suture to be placed under excessive tension. This ultimately can lead to overloading of the suture and premature stretching or breaking of the suture.
The suture material is then passed through the 14 gauge needle. After that the needle is removed and the suture material has passed through the tibial crest in the location and direction that’s desirable.

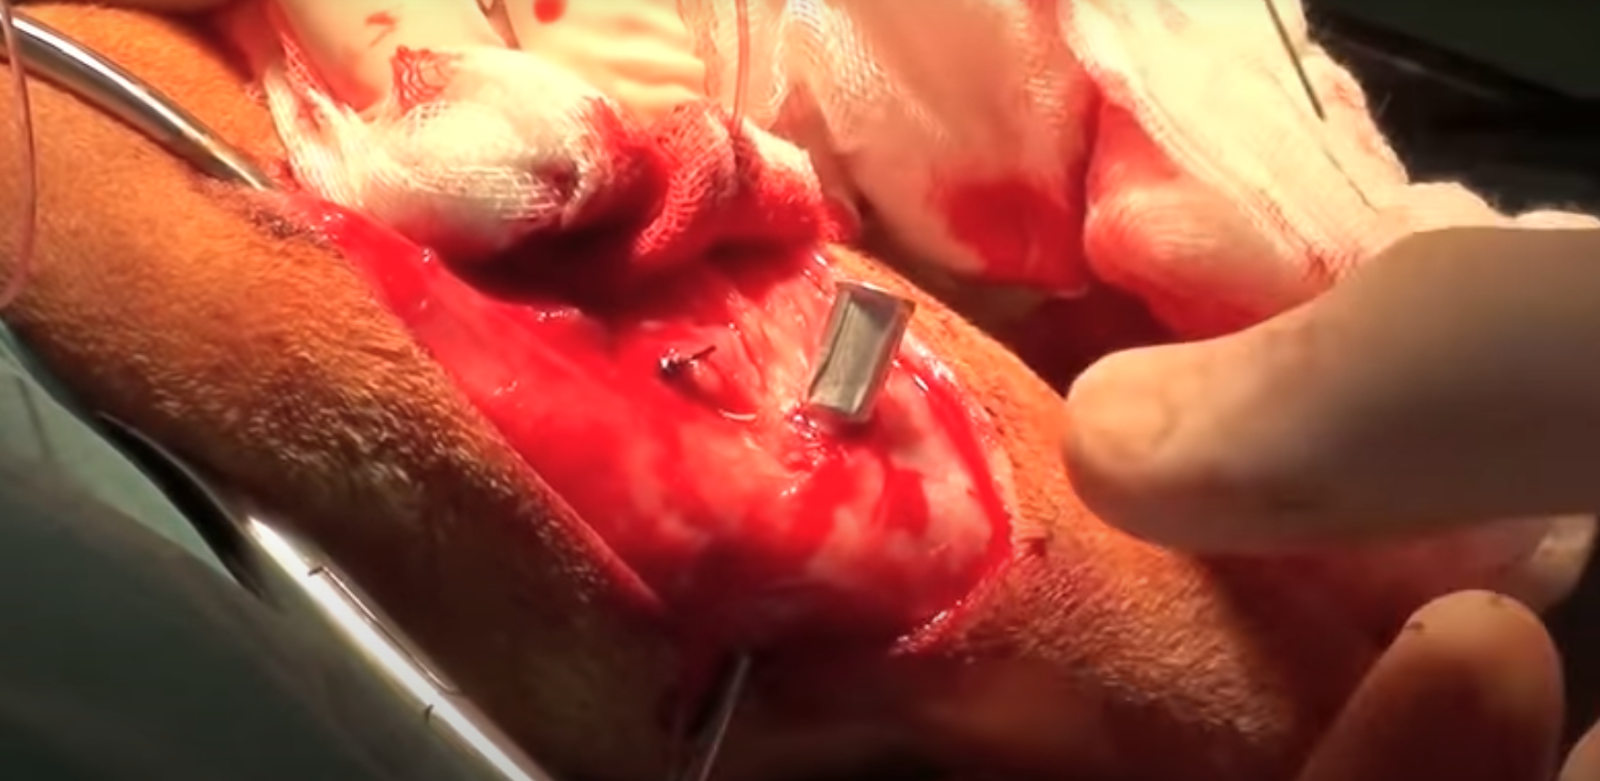
The suture can be secured by tying a knot or using crimps. The author prefers to use crimps as the resultant knot that is formed using nylon leader is very bulky and can can cause soft tissue irritation. Typically two crimps are used for a single suture to provide adequate stability and tensile strength for that repair.

To apply tension to the suture, grasp the ends of the suture using instruments like needle drivers or large haemostatic forceps, and then use a crimping plier to crimp the stainless steel crimps.

Squeeze each crimp in three places but be careful not to cut the suture material inadvertently with the crimping pliers.
The amount of tension that is applied to the suture should be adequate to eliminate cranial drawer but not excessive. The joint should be able to freely move through a range of motion with an amount of tension that eliminates cranial drawer. If the bone tunnels are not located in an optimal location then excessive force may be required to eliminate cranial drawer.

Once the crimps have been fixed the surgical site can be closed. The site should be flushed thoroughly with saline before closure.
The first step in closure is to reconstruct the biceps femoris muscle. Cre should be taken to close the biceps fascia accurately. Typically 2/0 PDS is used in dogs < 10kg. Following this closure the lateral geniculate fascia lata can be closed using just a simple continuous suture pattern. 3/0 PDS is typically used for the fascial closure.

Finally the skin is closed with intradermal sutures or with skin sutures.

Vetdojo is a new e-learning platform which provides academic information distilled into real world, practical skills that veterinarians can apply in a clinical setting.
Students have access to informative and educational surgical content, mentorship, and support plus ability to connect with a community of like-minded vets to share challenges and questions.
To view the range of courses or start one today visit www.vetdojo.com.